PPL Lesson 2 – Getting the basics
PPL Exercise 4 – The controls
Todays lesson continued on from my first lesson (PPL Pilot – L1 – Controls) . We once again concentrated on all the control surfaces and the affects they have when used together, plus the effects of power changes.
Getting ready to go
I walked through the external pre-flight checks with my FI and made a much better attempt at getting in the cockpit this time around. We went through the pre-flight checks together and once again we were soon taxiing out for take off.
Once up in the air I took control and we quickly brushed up on the last lesson. We then moved into the effects of applying flaps. Apart from slowing you down somewhat, it also demonstrated how the nose of the aircraft drops and gives you a much better forward view. It comes in handy when you come to land the aircraft.
Feeling the effects
Next up was the effect of making power changes. Now the engine in the PA28-161 may red-line at just 2500 rpm, but they do kick out some power and when they do, you know about it by way of yaw. An aircraft has three axis, nose up/down, wing high/low and last of all, nose left/right, known as yaw. Yaw in this case, is produced by the corkscrew effect of air created by the propeller. It is being pushed along the length of the aircraft in a spiral and striking the tail from the left hand side. This makes the nose of the aircraft yaw to the left. This in turn has to be counteracted with a good dose of the right rudder peddle to keep her pointing in the right direction. The other effect is the nose is also 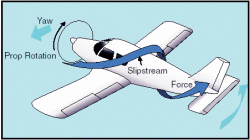 going to rise as you increase speed, so you need to apply forward pressure to the column to keep the climb in check and at the rate you require.
We did a number of power changes and obviously the opposite happens when you reduce the power. You do not need to apply left rudder, just ease off the right enough to counteract. I am finding it difficult at the moment to get the feel of the rudder and I’m looking at my balance ball too much. Too much concentration on one single thing in the cockpit leads to other aspects suffering. It will result in your FI giving you a nudge and telling you to pay attention outside of the aircraft. Your concentration on one aspect may well have resulted in you turning, climbing or worse, decending!
Get your seating nailed
Learning how to interpret the view through the cockpit window will stop your need to constantly watch the instruments and free up brain matter to concentrate on other things. Finding your best seating position early on will get you there much quicker. You will find reference points on the dash, engine cowling and if fitted the centre bar of the windscreen to help you out. I am struggling with this at the moment. When I trim the aircraft thinking its level, my FI always informs me its either still climbing or descending ! So some additional work is required here.
Take the load off – Trim
Another area where I am having trouble is ‘trimming’. Elevator trim is an aid to the pilot and removes the need to keep a constant pressure on the column when trying to fly level. The elevator on the PA28 is the whole of the rear wing. It will pivot up and down, making the nose either point up or down. The elevator has a big surface area, and it not easy trying to get this in an exact position to stop the aircraft either climbing or descending. To do so requires trim. The rear of the elevator has a section that can be adjusted independently of the main section. You can see that area as grey in the picture above. This fine tunes the current setting and helps to keep the nose of the aircraft level.
I don’t know if it’s due to me being a little too strong and not being able to feel the slight pressure I need to trim out. It might be I am tensing up too much and need to relax my arms and grip more to feel it. Either way, I’m just not getting it at the moment.
This Lesson
15-05-15 : PA28-161 : G-BOZI : PUT : Conington to Conington : 11:10 : 12:05 : 0.55
Total time : 1 hour 45 mins